
Butt joints (and how to reinforce them)
Butt joints are simple, fast, and common—but weak if done wrong. Learn how to build them correctly and reinforce them so your work actually lasts.
BASIC - JOINERY/ WOOD MOVEMENT / SANDING
Sawdust BuzzBlog Editorial Team Led by AJ “Buzz” Eichman
2/8/20264 min read
Understanding the Butt Joint
If you’re just getting into woodworking, you’ll quickly encounter the butt joint. It’s the simplest joint you can make: one piece of wood meets the face or edge of another, usually forming a 90-degree corner. No fancy cuts, no interlocking profiles — just two flat surfaces abutted together.
That simplicity makes butt joints appealing for quick assemblies. Face frames, boxes, and temporary structures often start here because it won’t take long to make.
But here’s the reality you don’t hear often enough: butt joints are weak by nature. The reason is pretty straightforward — one piece’s end grain meets the other’s face or edge grain. End grain doesn’t glue well, so you’re left with a joint that can come apart easily if you don’t add some kind of reinforcement.
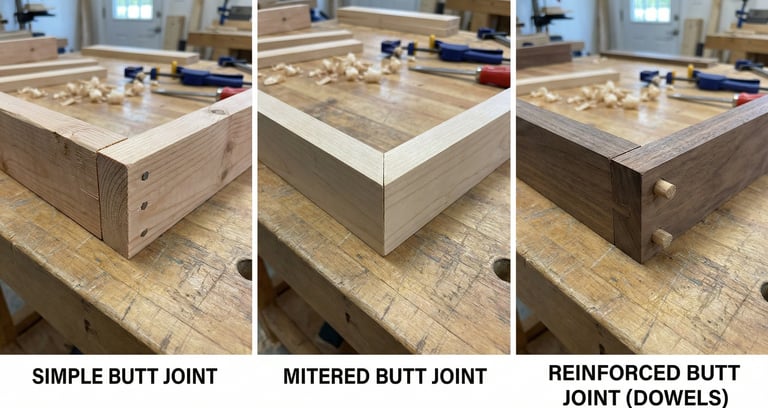

Types of Butt Joints in Your Shop
- Simple Butt Joint: Just two pieces joined end-to-face or end-to-edge, held with glue, nails, or screws. Quick but weak unless reinforced.
- Mitered Butt Joint: Ends cut at 45° so the joint forms a clean corner with no visible end grain. Looks better but doesn’t solve the strength issue.
- Reinforced Butt Joint: Uses dowels, biscuits, pocket screws, or cam locks alongside glue. This is the way to go if you want your project to last.
Making a Basic Butt Joint Right
Here’s the rundown that saves you headaches later:
1. Measure and Mark Precisely: Misalignment is the top cause of gaps that weaken joints. Take your time.
2. Cut Square Ends: Use a saw that’s up to the task — hand saw, miter saw, or circular saw. Ends not square? Expect trouble.
3. Prepare Surfaces: Clean, flat mating surfaces are key to a solid glue bond.
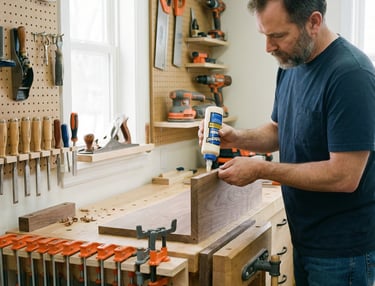
4. Apply Glue Thoroughly: Spread glue on both mating surfaces — even on the end grain, though it soaks in fast.
5. Clamp Tightly: Clamping is not optional. Without it, the glue line won’t fully form.
6. Add Mechanical Fasteners: Nails or screws help keep things together while glue cures and add strength.
Skip clamping or go easy on measuring, and you’ll pay for it in a weak, wobbly frame. Ask me how I know.
Why Reinforce Butt Joints?
You might be wondering if glue alone is enough. In my experience, it rarely is. Here’s why:
- End grain soaks up glue like a sponge, leaving little bonding material.
- The joint takes shear and tensile loads that can split or pull the pieces apart.
- Without reinforcements, joints develop gaps over time as wood moves or under stress.
Reinforcing butt joints isn’t just a nice-to-have — it’s what separates a quick project from one that will stand years of use.
Tried-and-True Reinforcement Methods
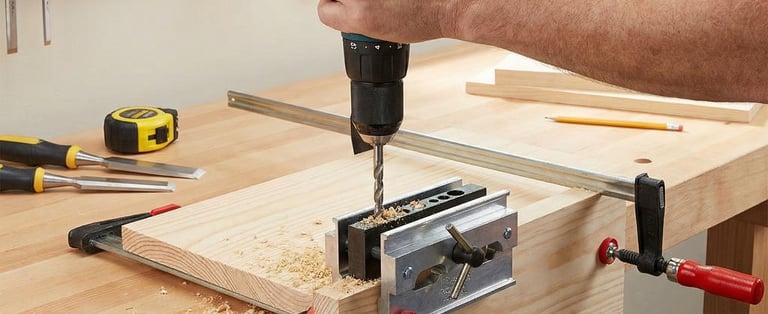
Doweling
Drill matching holes in both pieces and insert cylindrical wooden pins with glue. Dowels lock the joint mechanically and provide good alignment. They take a little time and a jig to get right, but I prefer this method because it consistently produces strong joints without visible hardware.
Biscuits
Slip in thin, biscuit-shaped pieces of compressed wood into slots cut on both edges. When glued, they swell and lock the joint together. Biscuits aren’t quite as strong as dowels but excel at alignment and are faster to install.
Pocket Screws
Use a pocket hole jig to drill an angled hole in one piece, then drive a screw into the other. This method is fast and creates a strong joint with the fasteners hidden from view. If speed and strength matter most in your shop, pocket screws are tough to beat.
Cam Locks
Common in flat-pack furniture, cam locks use a rotating mechanism to draw pieces tightly together around a metal post. They’re convenient but generally not suited for heavy-duty woodworking or structural frames.
Nails and Screws
Basic nails or screws help hold joints while glue dries but rarely provide enough strength alone. If you use screws, pre-drilling pilot holes is essential to avoid splitting.
Tools and Materials You’ll Need
- Reliable wood glue (PVA is standard)
- Clamps (bar clamps or corner clamps — no exceptions)
- Saw (hand, miter, or circular)
- Drill with correct bits (for dowels, pilot holes, or pocket screws)
- Doweling jig or biscuit joiner (optional but worth it for precision)
- Pocket hole jig (if using pocket screws)
- Measuring tape, pencil, and square for accurate marking
In my shop, skipping a jig almost always bites me back later, so I recommend getting the right tools early.
Common Pitfalls to Avoid
- Poorly cut or marked pieces: Your joint won’t fit right. No amount of glue can fix a bad fit.
- Not pre-drilling when screwing: Wood splits. It wastes both time and material.
- Relying on glue alone for end grain: You’ll get weak joints that fail under stress.
- Skipping clamps: Glue needs pressure to bond well. Just holding pieces by hand isn’t enough.
- Ignoring alignment tools: Without them, your joints can end up out of square or uneven.
These mistakes aren’t theoretical. They’re ones I’ve made — and fixed after cursing my initial shortcuts.
Frequently Asked Questions
**Are butt joints strong enough for furniture?**
Not by themselves. Reinforcements like dowels, biscuits, or pocket screws are necessary for load-bearing pieces.
**What reinforcement is best for frames?**
Dowels and pocket screws both work well. Biscuits help with alignment but are somewhat weaker under heavy loads.
Final Thoughts
Butt joints are the foundation of many woodworking projects because they’re simple and fast. But simplicity on its own won’t hold up under use. Reinforcing these joints with dowels, biscuits, pocket screws, or cam locks is what turns quick assemblies into long-lasting pieces.
Take the time to cut accurately, glue properly, clamp securely, and add mechanical reinforcements. It will save you headaches down the line and elevate your workmanship.
Master these basics, and you’re building skills that last — in both your projects and your shop practice.
Glossary
- Butt Joint: A joint made by placing the end of one board directly against the face or edge of another.
- Dowel: A wooden pin inserted into holes in adjoining pieces to strengthen and align the joint.
- Pocket Hole: An angled hole drilled to insert a hidden screw for joining two pieces.
- Mitered Butt Joint: A butt joint with ends cut at an angle (usually 45°) to form a clean corner.
- Cam Lock: A hardware fastener that pulls boards tightly together via a rotating mechanism...